Showing posts with label mixed media. Show all posts

Wednesday, March 6, 2019

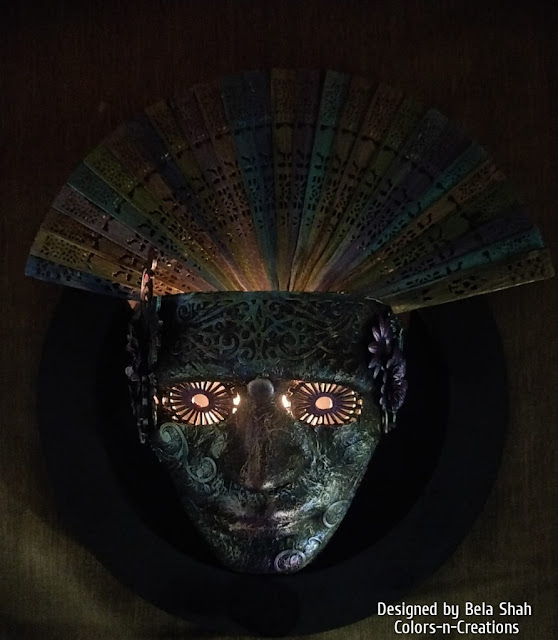
Spooky Altered Mask - Mixed media - Video tutorial


Hello All,
This is Bela and today on itsybitsy blog I have  an altered mask for you... Yes its spooky !!! totally out of my comfort zone as I am a person who never watches horror  movies... let alone movies I cant even watch a trailer...

I had bought this mask from a fair long time ago and it was lying somewhere in my stash and i took it out few days ago so that i can work on it... and one day when I got up in middle of the night for a drink of water i saw it and for a moment I got scared... ha ha ha... then I told myself... come on Bela its just a mask which you bought ... That's when the thought came that i can make it more spooky than it already is n here I go... I have also made a video tutorial for the same. Hope you enjoy the process.

Here's the step by step Instructions...

I gave the texture to the whole mask with tissue paper. I used deco magic glue to adhere the tissue in such a way that it had wrinkles so give the added texture to my mask.
Primed the whole thing with black Gesso and dried completely. Embellished the sides of the mask with some steampunk, wooden and metal embellishments..... left side i kept it more heavy then the right.....

Also added die cuts on forehead and left side of face near eyes n right side of face near the chin . Once was happy with the compilation i covered everything in black gesso again.
Now it was time for the coloring part... I chose metallic . I started dry brushing in various tones of green, blue and purple n pink also added touch of gold and bronze to it.....

There my mask was ready..... I was somehow wanting to convert it into a decorative wall piece for home decor... only mask would do that work but that to add a panel behind it and also a beautiful fan for the added decorative value.... for that i took 3 layers of 8 mm mdf ring with width of 1.5 inch... stuck it on a 2 mm mdf 12 inch board. i needed the depth where my mask will fit. I primed the rings base n masks with Gesso .


Kept the ring plain black so my mask n fan become focal point... After priming the fan with black gesso i just colored the folding strips with all the colors I have used for this project. I have also added a bulb by making a small hole in the back of the panel base... so at night can serve as night lamp which is gonna scare the hell out of you.  wink wink.... not you all but i m sure me...
I hope you like the project which is very different than my normal style....

Few Pictures:-


With Light Inside it


Video Tutorial Link :- 


Thank You  for stopping by 

Love & Hugs Bela


Monday, September 10, 2018

Hope & Love – Altered Mixed Media Bag Tutorial


Hello crafty Friends…. Greetings from me. This is Bela and today on Little Birdie Blog I am very excited to share with you a step by step tutorial of an altered bag. I always used to think why to alter a bag? what not do the same kind of layout on canvas? But when I got an amazing response to my previous altered bag I thought why not make one more. I got lovely compliments from friends on Facebook saying that they loved the bag and how it can be used to gifting without wrapping the gift. they also said the person who receives the gift will get 2 gifts at the same time. The bag and also what inside of the bag !!!


So here’s the step by step to yet another Bag tutorial which is so different from the previous one and yet it turned out amazingly beautiful. Also this will go to my swap partner of August as the theme of the swap was to make some artwork with whatever we have at home. I hope she likes it as much as I Loved making it.


Here I have taken a Domino’s Pizza takeaway bag and added some old book pages here and there for the vintage look. Then I added the texture with steampunk stencil with grainy texture paste which is my favorite from the store. Also added a long piece of off white card stock which I distressed with scissors and added some brown oxide ink for old look.


My next step was to use the MDF leftover from the steampunk cutting and cover the whole thing with black gesso.


I added the  layers of old book, steampunk texture, waste mdf , plain distressed cardstock , corrugated sheet and the vintage picture of a girl which was digitally photoshopped with script that matched totally with my old book script . I chose it as I felt it was so balanced yet very classy and coated with acrylic soft matte gel to protect it. I also added more stenciling  with the grainy texture paste on the right side of the picture as it was empty there. also added splatters of white and black gesso everywhere on the bag except the face.


I added the  layers of old book, steampunk texture, waste mdf , plain distressed cardstock , corrugated sheet and the vintage picture of a girl which was digitally photoshopped with script that matched totally with my old book script . I chose it as I felt it was so balanced yet very classy and coated with acrylic soft matte gel to protect it. I also added more stenciling  with the grainy texture paste on the right side of the picture as it was empty there. also added splatters of white and black gesso everywhere on the bag except the face.
My next step was to add some beautiful yet subtle flowers from little birdie as they not only gave a little feminine touch to the very hardcore mixed media but also made the girl look beautiful as if she had those flowers in her hair. I love that look.


Last but not the least I wanted to add a perfect sentiment for this lovely upcycled piece of art. So I added a perfect sentiment which says HOPE & LOVE MAKE BEAUTIFUL PEOPLE. Isn’t it perfect ? So here’s My beautiful vintage bag which looks super classy with the perfect picture, perfect flowers and a perfect sentiment which really compliments the shabby background.


I really really really hope that you all give this tutorial a shot and send me your versions of it. Thank you for stopping by.
Love & Hugs
Bela


Saturday, September 8, 2018

Friends Forever - A Mixed Media Altered Box Shabby Chic Style - step by step tutorial

Hey Friends,
Today I am here with a beautiful project and the step by step tutorial of a beautiful Altered Box I did for PRIKA.
First of all I would like to thank Priyanka for this awesome opportunity and also for the patience that she showed when I wasn't able to do the project  couple of months ago due to family obligation.
Thank you once again.

I am also putting this up for Mixed media Place - August Challenge.

so without further ado lets see the step by step procedure for this project.


I took a waste led light box and added a corrugated sheet on the lid and applied gesso all over on the lids sides and the flap. Its a very good quality box with magnets that's why I didn't have the heart to throw it. after the application of White Gesso I added some MDF left overs to give a beautiful texture and also coated them with gesso. It will look something like this.


Once the gesso was dry I started building up the composition. Till this point I didn't know which colors I will be using for this project. I usually make vintage and metallic kind of boxes so this time I thought of doing something different. So I thought of using peach , yellows and pinks for my project .

 Played around with the flowers and wooden embellishments and thought of using lots of die cuts for the shabby chic look. 


I sprayed lemon zing, hot pink and tangerine color splashes from little birdie crafts to get the look and the color that matches the flowers. Diluted it with water and took away the extra color with the tissue.  Added the beautiful flowers from little birdie , leaf die cuts, few mulberry roses, and a lovely quote " Friends for Life "


Added beautiful pearls in big medium n small size. Added lovely organza ribbons to add more shabby chic look. I hope you like the Beautiful Altered  Box in Shabby Chic style.
Would love to see your creations from this inspiration.

Love & Hugs 

Bela


Saturday, August 18, 2018

Love - Mixed Media Canvas - Video Tutorial

Hello Friends !!
Bela Shah here with my latest mixed media canvas.

Mixed media is so much fun and this time I have tried to do a project which is out of my comfort zone … I took it up as a challenge and I am thrilled with the way this looks right now... I know that this is mixed media canvas but I kind of remember my kodiakanal trip where I saw beautiful hydrangea flowers... as this project has similar colors...
Also I would like to see your creations so tag me on Facebook so I know how much this post has inspired you. The video tutorial will be super helpful where you can see how I have worked with Little Birdie Craft products to make this lovely project.
Few close Ups of the project ….


Please check out the video tutorial for the project. Don't forget to leave some love and comments !!!

https://youtu.be/yGkf4bhdhYM


Love & Hugs

 Bela 


Saturday, June 9, 2018

Eyes - Mixed Media Panel

Hello Friends,
How are u all doing today!!!!
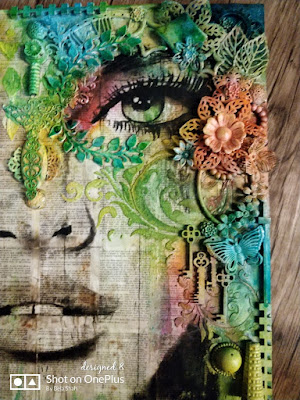
Its raining in India and I love it when I get to see all greenery around me when rains washes the trees  and they look more greener, more prettier and more lush. And as they say beauty lies in the eyes of beholder... so My new Mixed Media project is inspired from the eyes that are beautiful and the eyes that see beauty and the green n yellows n pinks and blues of the trees and nature.... I hope u all like it as it was challenging for me to use so many colors and still get the effect that I was looking for....

This idea was on my mind from a long time and today I finally finished. I mounted my paper on 2mm mdf to make it sturdy as I knew I was gonna use lot of water and I din want my paper to warp. then i started playing with my embellishments.


 I not only used wooden embellishments but this time I used resin, fiber, metal and also few paper die cuts for the look that I needed. I used grainy texture paste for my stenciling and few sprays from lindy's and few color splash from little birdie too .

While compiling this piece I just didn't want to fill up the whole face with mixed media elements as I also wanted to conserve the beauty of the girl in the picture that's the reason i played with only half part of the face and half I kept it plain with just touch of colors here and there.

So I  hope you like this project just as much as I love it not to forget the process while I was making it. This is the completed look of my project.


I hope this post will be creatively inspiring. Thank you so much for stopping by. Would love to see what you feel about this project in comment section.

Love & Hugs
Bela


Monday, March 26, 2018

HOME - Mixed Media Panel


Hey Friends !!!! Today I am here to present you with my new mixed media home décor panel. It  was a quick project which was in my mind from a long time. I thoroughly enjoyed making this one .. I hope you all love it too...... The picture below is taken in the sunlight and I loved the way it looked. 


For this panel I used a 6mm 8 x 8 wooden panel, I have used MDF carved framed for the border. The things I used in this project are Gesso, texture paste , medical gauge, art stones, some dry fillers, mulberry roses, die cut leaves and window, spray paints in green , brown, orange, yellow n some turquoise. These are some close up pictures of the panel for you all to have a better look. 


Thank you for stopping by !!!! I hope this project of mine inspires you 

Love & Hugs 
Bela  


The Positive Vibes Hop - BLESSED - An Altered Telephone in Mixed Media Pictorial

Hello !!! I am Bela shah. Welcome to The Positive vibes hop. The purpose of our blog hop is to start the new year on a colorful & ...