Showing posts with label altered art. Show all posts

Wednesday, March 6, 2019

Spooky Altered Mask - Mixed media - Video tutorial


Hello All,
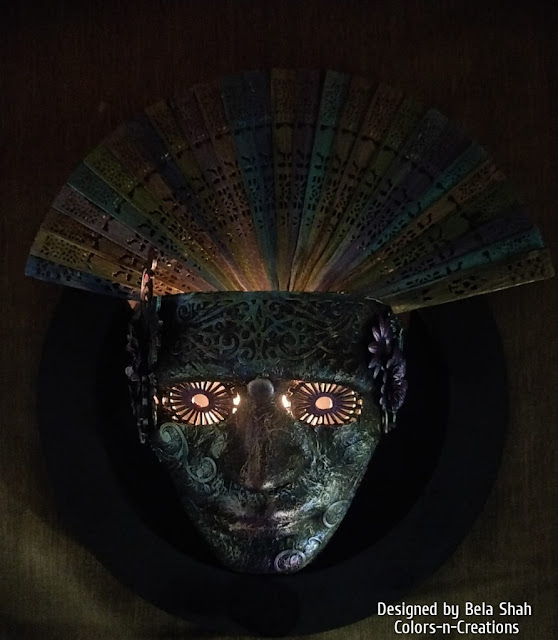
This is Bela and today on itsybitsy blog I have  an altered mask for you... Yes its spooky !!! totally out of my comfort zone as I am a person who never watches horror  movies... let alone movies I cant even watch a trailer...

I had bought this mask from a fair long time ago and it was lying somewhere in my stash and i took it out few days ago so that i can work on it... and one day when I got up in middle of the night for a drink of water i saw it and for a moment I got scared... ha ha ha... then I told myself... come on Bela its just a mask which you bought ... That's when the thought came that i can make it more spooky than it already is n here I go... I have also made a video tutorial for the same. Hope you enjoy the process.

Here's the step by step Instructions...

I gave the texture to the whole mask with tissue paper. I used deco magic glue to adhere the tissue in such a way that it had wrinkles so give the added texture to my mask.
Primed the whole thing with black Gesso and dried completely. Embellished the sides of the mask with some steampunk, wooden and metal embellishments..... left side i kept it more heavy then the right.....

Also added die cuts on forehead and left side of face near eyes n right side of face near the chin . Once was happy with the compilation i covered everything in black gesso again.
Now it was time for the coloring part... I chose metallic . I started dry brushing in various tones of green, blue and purple n pink also added touch of gold and bronze to it.....

There my mask was ready..... I was somehow wanting to convert it into a decorative wall piece for home decor... only mask would do that work but that to add a panel behind it and also a beautiful fan for the added decorative value.... for that i took 3 layers of 8 mm mdf ring with width of 1.5 inch... stuck it on a 2 mm mdf 12 inch board. i needed the depth where my mask will fit. I primed the rings base n masks with Gesso .


Kept the ring plain black so my mask n fan become focal point... After priming the fan with black gesso i just colored the folding strips with all the colors I have used for this project. I have also added a bulb by making a small hole in the back of the panel base... so at night can serve as night lamp which is gonna scare the hell out of you.  wink wink.... not you all but i m sure me...
I hope you like the project which is very different than my normal style....

Few Pictures:-


With Light Inside it


Video Tutorial Link :- 


Thank You  for stopping by 

Love & Hugs Bela


Wednesday, August 22, 2018

Hope- Mixed Media Altered Folder - Video Tutorial


Hey Friends !!!
Greetings from India !!! Hope you all are doing well and are ready for mixed media tutorial which I enjoyed a lot as it was quite different from my usual work. I really wish you all try this at least once on anything that u have at home - like a diary or box or any plain canvas.


I had a bank folder lying around and I had kept it thinking that I would use it for some art work for sure. So today is the day !!!
I am totally in love with it as it turned out much different and far more better than I had in my mind. So here's a walk through how I did it and u can check out the video for the tutorial. I started by using grainy texture paste with the stencil to give some texture to the base as the folder was just plain . to add little more interest in the empty space I added few die cuts. then I started with using some twigs , some metal and some steampunk gears for building up my composition.
Added black gesso for priming . I thought to finish the whole piece with metallic tints. Since I didn't have the metallic color in teal  added gold to my plain acrylic paint. I dint want my embellishment to merge with the base and wanted them to stand out so I did black gesso on it again and gave metallic tint to all my embellishments. Added little gold touches to the background for a more balanced look.

In the end I wanted everything to look perfect so added gesso with sponge on the edges as the inside of the folder is also black. For more distressed and worn out look I added little bit of black from the sponge on the textures too till I achieved the look that I wanted.

I hope you all give this project a definite try. Don't forget to show some love in form of comments. If you don't understand something you all know where to find me :) I will be more than happy to help.
Check out the complete video Tutorial on the link below: leave some love & comments for more motivation if you like the project.

Love & Hugs
Bela


Monday, May 7, 2018

Make a Wish - An Altered Hoop step by step tutorial


Make a Wish – An Altered Hoop Step by Step Tutorial


Hello Friends,  It’s Bela Shah here, and I’m super happy and excited to be sharing my very first Little Birdie Crafts Design Team Project with you today!


I have always loved doing altered projects and altering a hoop was on my mind since a long time and when I saw Little Birdie flowers in my DT kit, I thought this would be the perfect project to share with you all.
For this altered project, I took three different sized hoop rings and applied gesso on all to prime them. I added Little Birdie Fiber paste for the texture to add interest to otherwise a plain hoop. Sprayed it with Hot Pink color splash. I simply adore the Little Birdie sprays.
After that I traced the ring and cut 300 GSM cardstock for all the three rings as per their size and distressed the edges with brown distress oxide and  adhered it on the loop from back.
I also cut three circles from three different pattern paper from the 12″x 12 ” Watercolor Floral Ballet Paper Pack and distressed the edges with scissors and added brown distress oxides to the edges. To give it more dimension I sprayed some water on the edges and curled them on all three of them.
This is how your ring will look after the process. I chose a beautiful picture of a baby girl in 2 different poses as my focal point. I adhered it on a photo mat and distressed the edges . To give a beautiful shabby chic style I used laces from my stash and colored Little Biride Cheese Cloth with Lime Splash Color Spray for extra texture and added them behind the photo for big and medium sized rings.
After all the three hoops were ready, I adhered them using silicon glue, one below the center hoop and the smallest above it. Now it was time to embellish the project with beautiful flowers. I used Margerry Pearl Pink box flowers to enhance mine , added some foliage around and to add more to the shabby chic look I used tissue ribbons in white color behind the flowers.
Now it was time to add sentiment to the project. I used “Make a Wish” chipboard from on the Birthday Wish and splashed it with hot pink color splash directly as these chipboards are already primed and added it on the smallest ring.
You can use this Beautiful shabby chic altered hoop as a Home Décor or gift it to someone and bring a smile to everyone’s face.
I absolutely enjoyed making this one and I have shared easy step by step procedure . I hope this post is creatively inspiring for you all .
Thank you for joining me .
Love & Hugs,
Bela

Supplies from Little Birdie Crafts:


The Positive Vibes Hop - BLESSED - An Altered Telephone in Mixed Media Pictorial

Hello !!! I am Bela shah. Welcome to The Positive vibes hop. The purpose of our blog hop is to start the new year on a colorful & ...