Tuesday, January 29, 2019

Love - Mixed Media Art Journal


 Hello !!! Hello !!!

This is Bela Shah and welcome to my blog Colors-n-Creations..... 
I am super excited about this post today as this one turned out totally different than i thought or imagined.... I am a person who goes with the flow , usually don't know how my project will look like but at least there's some vision.... however in this project with loads of trial n errors I made the fabulous art journal page. Only thing in my mind was that I wanna do some kind of collage .... rest all fell in its place...

Off lately I have been hooked on to art journaling as it gives me the freedom to play with colors, words, mediums, textures & its doesn't have to be perfect, complicated or expensive , just my space which can turn out amazing or not but in process you are bound to learn something that's for sure.


You all can give it a shot and make something unique.... For this one I primed my page, did collage or opp side of my art journal, played with texture paste and added coordinating colors to the center of my page. also added some interest by splattering black white n purple..... added the hearts as they complimented  LOVE sentiment .


Enjoy the pics and I hope this will inspire you to create a art journal page. Give it a shot I am sure you will be surprised at the outcome.


Thank you for stopping by ... 


Love & Hugs
Bela


Monday, January 21, 2019

The Greatest Prayer is Patience -Buddha - Mixed Media Canvas with Instant Image Transfer Tutorial


Hello All,
This is Bela Shah for Itsy Bitsy blog today !!!

This is my Design Team blog post for them and I hope you all are as excited as me for something different and amazing ... This post is about Little Birdie's Instant Image Transfer in which you get immediate results without waiting for a whole day of suspense how your project will look like .

So without further ado lets hop on to the step by step pictorial for this amazing project I have created.... I hope you all love this project just as much as I do.


I do lots of different crafts like decoupage, flower making, altered arts , calligraphy, paintings etc.... however now a days I am high on mixed media as its very versatile and can be merged with any other kind of art.... also it triggers your imagination till the last point. I absolutely love the surprise element of it so i thought why not merge the image transfer with mixed media.

I selected a beautiful and artistic image of Buddha for my project. I took a laser print on a normal paper . Applied a generous quantity of the instant image transfer gel onto my canvas sized . After that I stuck the image face down on to the canvas and pressed it gently n firmly to see it stuck properly on to the canvas ... also this step help spread out the gel evenly and also removes any trapped air bubbles . also the heat of the hand and the friction produces heat which helps the image get transferred onto the canvas thoroughly. Once I was satisfied with the adhering part I sprayed some water to moisten the canvas and started peeling the paper. first layer of the paper comes of super easily .


After that step comes the most important part.... And just as the title says the greatest prayer is patience .... this is a project which needs loads of patience..... I guess the title is apt for this project ... wink wink.... so slowly n steadily with gentle hands start rubbing the paper in circular motion .. it will peel the paper away.


Try and remove all the peeled paper from the canvas every time you start rubbing again... I know its little messy and time consuming but truth me its worth every effort. These are the pictures of the different stages of peeling off the layers of paper.

Once all the peeling of paper is done and you are satisfied with the way image looks we are ready for our step no 2. the perfect way to know that the transfer process is complete when you see a proper image without any white haze. if you see a white haze after drying that means there's a still a layer of the paper that needs to be peeled.

After this image was totally dried and no moisture was left i painted the white border with black gesso . it gave a proper definition to my project. Also after applying gesso and drying it properly i applied a coat of Deco Magic glue to seal my Image transfer.


I wanted to create a beautiful Home Decor piece with my image transfer canvas. so i took a left over mdf wood piece . Primed the whole piece with black gesso.


I chose a beautiful and my favorite stencil and added texture on the whole panel with grainy texture paste. once it was dried I sprayed bright colored splashes which matched the colors of Buddha image .


I added a backing to the buddha canvas to elevate it and give it a dimension and adhered it on to my mdf. My mixed Media with Instant image transfer Home Decor piece was ready ....


I feel this project is perfect for home decor . I hope this post creatively inspires you all...


Love & Hugs
Bela


Sunday, January 13, 2019

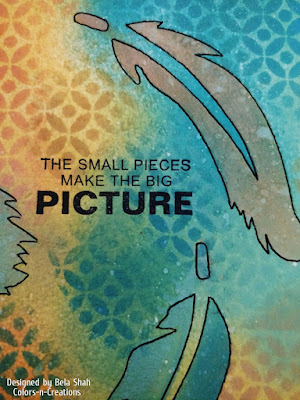
The Small Pieces Make The Big Picture - Art Journal Page


Hello Friends,
This is Bela Shah and today I am here with an art journal page which I m in love with.....
This journal page was all about expressing  and I played with little dark tones which I usually don't do in my projects....

So here I started using distress oxides in cracked pistachio, fossilized amber, spiced marmalade n peacock feathers..... I started putting colors here and there n made a page which was super colorful, bright and with all my favorite colors.... once this was dried i started stenciling the feathers with the same set of colors on my background.... I absolutely love the way oxides layer on each other and its magical.... once I was happy with the placement of the feathers i outlined them with a permanent marker... it gave amazing definition to my page.


I stenciled again with the same set of colors on to the blank spaces to add little more interest to my page . then i added water splatters to the feathers and the oxidization made the feather look different from the rest of the background....

with this I was totally satisfied with the way my page looked at this point.... Then only thing left to complete the page was the sentiment... i chose these two from the set that I had and i thought these fit perfectly to my theme....


I am super happy with the way this page has turned out.... I hope you all love it as much as I do....


Thank you so much for stopping by... Dont forget to leave a comment...I really love reading your thoughts... 

Love & Hugs
Bela


Wednesday, January 9, 2019

Altered Sun Glasses & Case


Hello Friends,
This is Bela Shah and once again i m here with you all to share my favorite type of art that is Altered Art. I don't know why but there's an immense satisfaction to alter a piece of junk or waste  or a broken thing and give it a beautiful new look . The whole transformation process so so amazing that it has become my passion to alter anything I can get my hands on.... 

So this time its a broken sun glasses ... then i thought why not do the case too!!!!
I am in love with the way the colors pop and enhance the creation and gives a totally new look to the case and glasses.


For this first I applied black Gesso to the case and let it dry. Added texture with stencils using mixed media paste from Little Birdie Crafts and again dried it . then i started adhering the metal embellishments. I wanted to make it little girly that is  why I added flowers n leaves in my stash. some art stones from Prima. once i was happy with the composition then again covered everything in black gesso... after that i dry brushed white gesso as i wanted few highlights on my embellishments. I used finnabiars Opal magic paints to color my art work. sprayed few lindys sprays too. dry brished everything with gold to give it good highlight n neutral look...


After the sun glasses case was done it looked so beautiful that now i can use this as a clutch too !!! How cool is that !!!


For the sun Glasses I used few flowers small steampunk gears, art stones covering everything in black gesso and putting same colors and sprays which i used on case so that they compliment each other .....


I hope you like my this Mixed Media Altered Art as much as i loved creating it...Hope it inspires you to create something from a total waste to something very beautiful and unique.
thanks you for stopping by. Don't forget to leave love in form of comment. I really look forward to reading them and know your thoughts.

Love & Hugs
Bela


Tuesday, January 8, 2019

Happy New Dreams - Art journal


Hello Friends,
First of all let me thank each and everyone who took part in the positive vibes hop. Thank you so much for all the lovely comments and compliments and love that you have showered on my altered art... I m so touched by the gesture and i appreciate each and everyone who stopped by.

Today I m here with am Art Journal page ... I am so so happy with the way its turned out... super simple, super colorful and super Gorgeous..... so without further ado let me explain how I did this page. I first did the stenciling from the top left hand corner till the bottom right hand corner . I did the same step on other page by starting all the way from left hand corner till the bottom right corner.... u can play along any way you  like with any stencil you have...
I wanted dark teal and turquoise color where the texture is there and go very light where its plain. I started with turquoise then moved on to green n then lemon which faded to both the pages... dried it thoroughly.

I wanted a focal point so I used the dream-catcher die cut and added same colors in bold so that it stands out from the background. with dream catcher i thought these quotes are apt. Happy New Dreams... The distance between dreams and reality is action... and added a small feather stamp to balance out . Dreams and stars go hand in hand so stamped small cluster of stars around the dream catcher and around the quote... Done...


A simple yet beautiful art journal page is ready. I hope this post creatively inspires you all...
Thank you for stopping by.

Love & Hugs
Bela


Tuesday, January 1, 2019

The Positive Vibes Hop - BLESSED - An Altered Telephone in Mixed Media Pictorial


Hello !!!
I am Bela shah. Welcome to The Positive vibes hop. The purpose of our blog hop is to start the new year on a colorful & creative note, spread positivity & good vibes. We hope you'll enjoy the mixed media projects & pictorials we have prepared.

My Project - BLESSED - An Altered Telephone In Mixed Media .
For me the word positive means a lot of things like love, affection, blessing, Art , Creativity etc ... However, I also feel that  giving a new look to an old and vintage thing without destroying its essence is positive in its own way too.... So for this Positive Hop I have Altered a telephone which was not only vintage but very close to my heart... So rather than discarding it for something small n digital I altered this with mixed media in rustic finish with a touch of patina..... which will be a signature piece as a home decor in my house.

Here are few pictures of the Beautiful Vintage Telephone.


PICTORIAL OF  THE PROJECT 

This is how my old Telephone looks from front and back 


Once I had planned out what I wanna do with the phone I started adhering all the embellishments with heavy gel medium .... You can give a coat of gesso before you start this step. However I like to see the main element in its true form for my creativity to flow.... I stuck all the beautiful embellishments like lace at the bottom, thick twine on the handle or mouth piece, frame on the top, clock dial behind the dial, also added coconut fiber behind the dial for the extra texture, lovely vintagey mdf embellishment at the back, and some metal embellishment at the sides to give the phone the look that i really wanted. 

The best one was the face and the wings that I added at the center of the piece which made the phone look super catchy and very different and unique... I also added a metal butterfly or two... The below pictures will show you the exact way the telephone looks after the embellishments were stuck. Last but not the least I added the most positive word BLESSED which I thought can be perfect for this positive blog hop.


Once this step is done and everything is thoroughly dried then i applied a coat of Black Gesso to the whole Telephone. This will prime all the different embellishments for the color.... The project is huge and 3D so the post is long and I have tried to click and show you the pictures from all the different angles and perspective so I m really sorry for the same. this is how ur project will look after applying Black Gesso.


After the black Gesso is dried completely It time to give the rusty look which I immensely love.... 
the biggest compliment is when someone says oh Its that old!!! bang on !!! that means you have done a perfect job of giving the project a rusty look. So for rusted finish I used Dark brown rust effect paste and covered the whole project with it. 


Then I took the lighter color in it and started dry brushing the project giving it the effect lighter or little intense in some place to make it look very natural. I also added the yellow rust touch here and there and created the highlights. You project should look something like this.


After the rust was done I started adding patina colors... Light green and patina. The photograph was taken with flash that's why its looking lighter however in real it was much more intense. I took me nearly 14 to 15 Hours at a stretch to finish this project. so by the time i came to this step it was already night. 


Once you are satisfied with the whole process and the way it looks It was time to add some lovely flowers which matched my patina colors and that gave a finished look to my project.


So this is how My Vinatge Rusted Telephone with Patina touch looks after completion. I hope you Loved this as much as I loved and enjoyed making it..., I thank you all to be a part of  this beautiful process and hope this lovely pictorial was creatively inspiring for you all.

I have also made a video Tutorial for the same :-


Our Sponsors


2d3463e20333087bd3f65e387286dec6d65cc795_TheCraftShop Homeafe211ac-2821-45bc-89e4-18c5d44f02c7CMYK Converted LogoDress My Craftedcb4342-b2f0-46d2-b84c-8d4a62f75aecexpressions craft logoFB_IMG_1540956558445 LOGO 2018 (1) fdfea179-035b-4261-85c4-74c3dc393945Final-logo2Greyimage002IB logo logo-green in logo9958ecb4-0ad7-4819-bb9e-1c7fc64e60b7Mudra - Logo-01nakshalogocs3Youtube0b5990a4-af8b-4dea-8c78-bc9fc8d88fae                   List of Sponsored Prizes:   

1. Dress my craft : gift vouchers worth 2000INR 
2. Prima marketing: goodies worth 25$ with free shipping worldwide 
3. The Elements of Craft Studio: goodies worth $40 with free shipping worldwide 
4. Crealies dies : 2 Goldie bags worth $50 
5. I-craft: 3 Goodie Bags worth 3000INR
6. Heartfelt creations: 5 Gift vouchers worth $25 each
7.Rainbow craftkari: goodies worth 2000INR
8. MUDRA: Goodies worth 2000INR with free shipping worldwide 
9. Kisan Arts : 3 Goodie Bags worth 2000INR 
10. Itsy Bitsy : online gift vouchers worth 2000INR
11. Canvas and crops brand: gift card worth $25
12.Expressions craft : Gift vouchers worth 2000INR with free shipping worldwide 
13. Oasis bazaar : Gift vouchers worth 2000INR
14 . Craftangles : Goodies worth 1500 INR
15. Papericious: online gift vouchers worth 1000INR
16. Nakshatra designs: Goodies worth 700INR
17. Madras Bazaar: Goodies worth 2000INR
18. Dadarkar Arts : goodies 
19. Die cuts and More: Gift vouchers worth 2000INR
20 Craft Shop: Goodies worth 2000INR


 Rules of the Hop:
To enter the sponsored giveaways you MUST:
1. Comment on all the blogs in this hop
2. Follow all the blogs in this hop
3. Share the hop with your friends on social media
Winners will be announced on 14th January, 2019 on our social media accounts, so please follow us to find out if you are a winner. Winners must email positivehops2019@gmail.com before 21st January, 2019 to claim their prize.


 Blog Hop List


 Find us on Instagram:


 Thanks a lot. Wish you a happy & creative new year. God Bless!

Love & Hugs
Bela 


The Positive Vibes Hop - BLESSED - An Altered Telephone in Mixed Media Pictorial

Hello !!! I am Bela shah. Welcome to The Positive vibes hop. The purpose of our blog hop is to start the new year on a colorful & ...